Featured post

DV-PI

NEW: Damn Vulnerable Raspberry Pi runs on all Pi’s

The touch friendly “driving range” for IoT penetration testing with your Kali-Pi.

Sticky Finger's Kali-Pi
Sticky Fingers DV-Pi – pre-configured with vulnerabilities for penetration and privilege escalation.
All DV-Pi’s can be operated with a touch friendly interface or headless via ssh.
Ideal tool for practicing, competitions and live-hacking events.

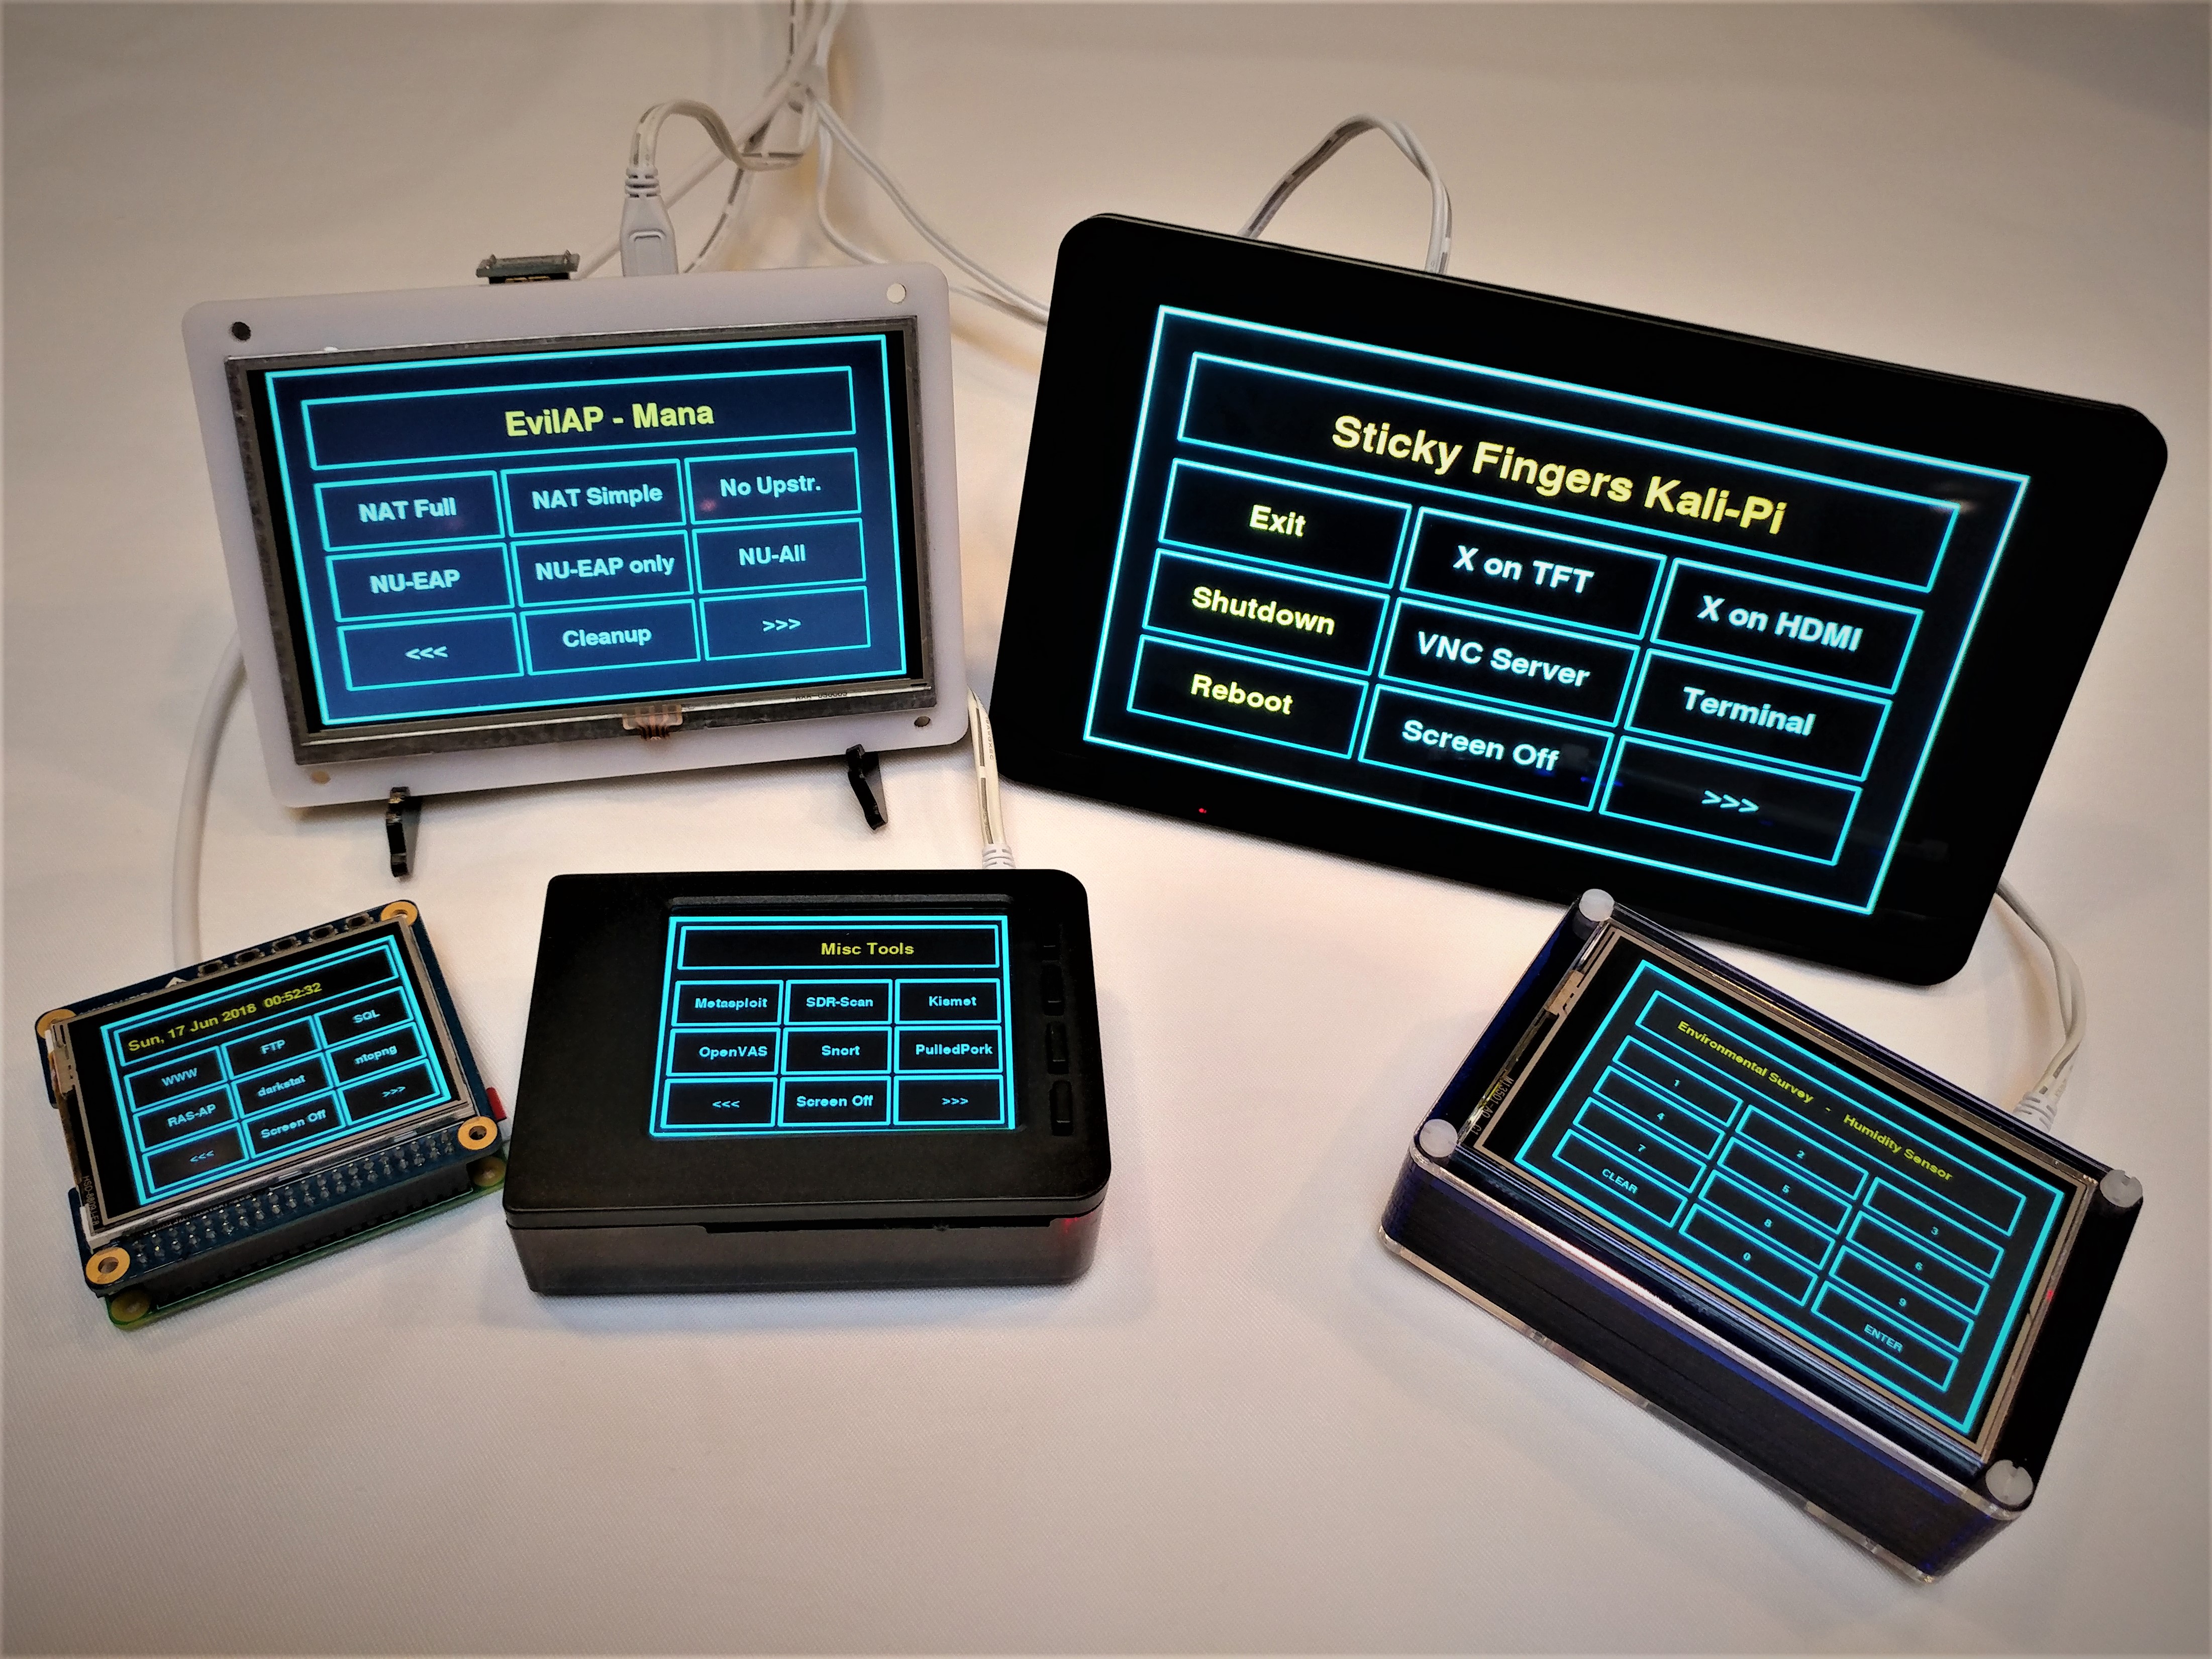
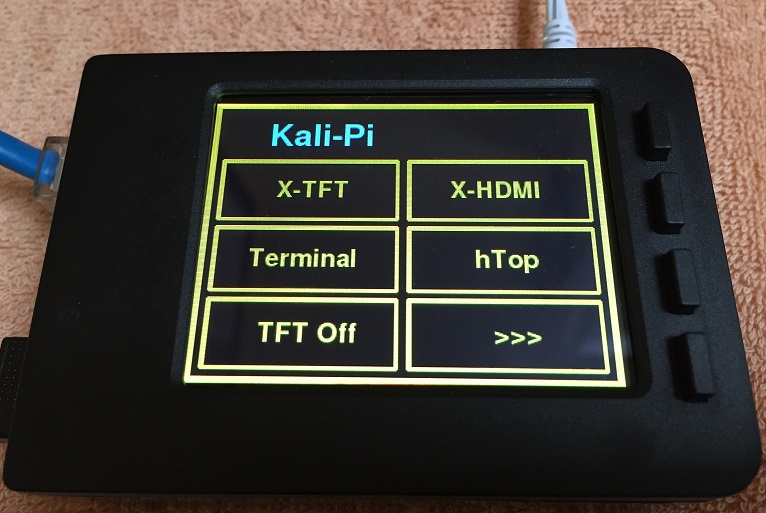
Need a penetration testing platform? Check out Sticky Fingers Kali-Pi

Sticky Fingers Quick Start Guide:

Sticky Fingers DV-Pi images come with the following features out of the box:

  • 3GB image ready to go with all common TFT screens
  • Re4son Kali-Pi Kernel 4.9 with touch screen support
  • Supports Raspberry Pi 0/0W/1/2/3/3B+
  • “re4son-pi-tft-setup” tool to set up all common touch screens, enable auto-logon, etc.
  • “dv-pi” command line tool for headless operation
  • Each image comes with one vulnerability to get in and one vulnerability to get root
  • Each image has two proof.txt with a hash to proof successful compromise:
    • /proof.txt
    • /root/proof.txt
  • Just run “re4son-pi-tft-setup” tool for your particular screen and you are up and running.
  • Don’t forget to change the password for user “pi” (default: “raspberry”)

“Damn Vulnerable Pi” images:

Name Difficulty Host name Size Size and link
Sticky Finger’s DV-Pi 2 medium dv-pi2.local 2.5GB sticky-fingers-dv-pi2
Sticky Finger’s DV-Pi 3
easy (ish)
dv-pi3.local 2.5GB sticky-fingers-dv-pi3
More to come

Anyone interested in creating DV-Pi images can send an e-mail to re4son <at> whitedome.com.au and I’ll share my template image to add some interesting vulnerabilities.

IMG_0208

Installation

  • Download a dv-pi image and image your microSD card (min 8GB)
  • Extend the file system if your card is > 8GB
  • Assemble your touch screen (only if you have one, it’s not required)
  • Boot up your Pi and ssh into it with user “pi” and password “raspberry”
  • Change password
  • Set up the screen with the re4son-pi-tft-setup tool:
    <span style="font-size: 8pt;">cd /usr/local/src/re4son_kali-pi-tft_kernel_4*
    sudo mount /dev/mmcblk0p1 /boot
    sudo ./re4son-pi-tft-setup -d    #(updates re4son-pi-tft-setup to the latest version)
    sudo ./re4son-pi-tft-setup -h    #(lists all options - pick your screen from the list)
    sudo ./re4son-pi-tft-setup -t <your screen> -u /root
    sudo reboot</span>
  • Sticky Fingers interface is designed for 3.5″ screens. You can adjust it for 2.8″ via:
    cd /home/pi/DV-Pi-Menu
    git checkout 2.8      #for 2.8" screen
    

Reboot

Operation

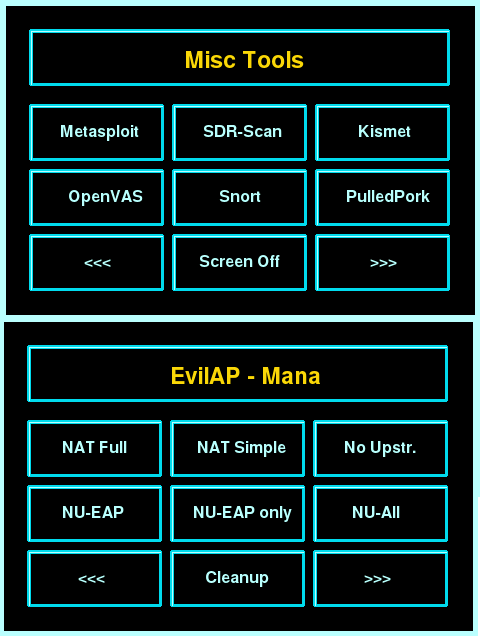
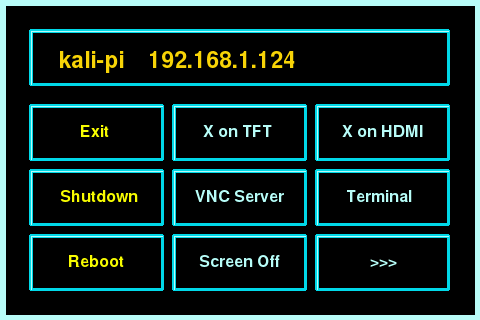
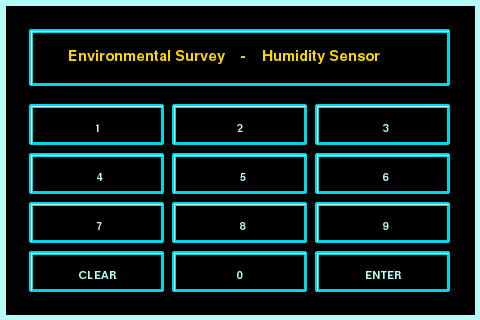
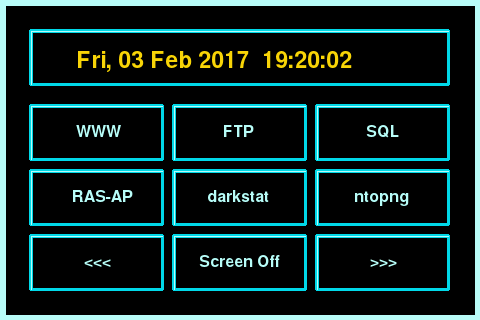
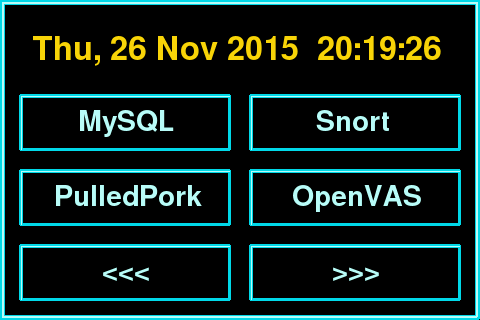
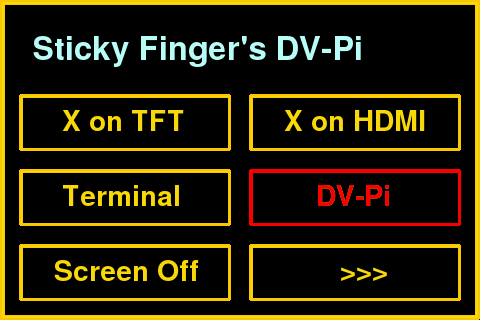
Sticky Fingers Touch interface

Press “DV-Pi” to start the vulnerable applications (might take a few seconds):
menu-3.5-1.2

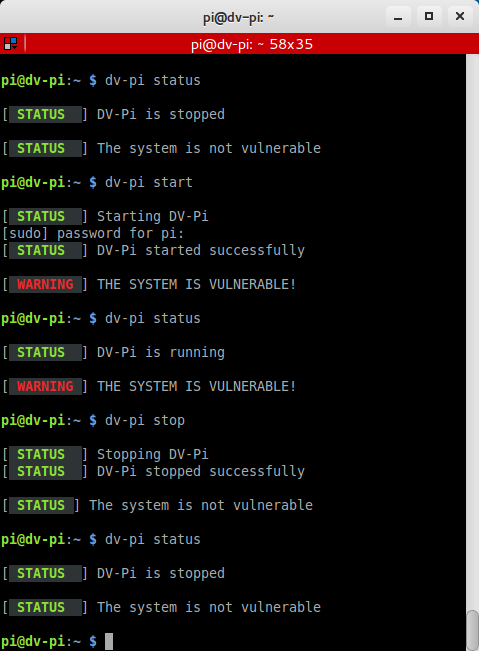
Headless using dv-pi command line tool

Sticky Fingers DV-Pi can be operated in headless mode using the “dv-pi” tool:

dv-pi status    # Show status of vulnerable applications
dv-pi start     # Start vulnerable applications
dv-pi stop      # Stop vulnerable applications

pi@dv-pi: ~_010

Usage

Add dv-pi2 to /etc/hosts on the attacker’s machine

Find the IP address of the dv-pi and add the hostname of the image with the ip address in you /etc/hosts”, e.g.

192.168.137.21    dv-pi2.local

Burn the password for user “pi” and start hacking …

Easter egg

 Customer Database

Sticky Fingers DV-Pi contains a database for demonstration purposes, containing 10,000 fake e-mail addresses and credit card details to add an exciting climax to live hacking sessions.

For questions or comments please join the discussion in our forum:
https://whitedome.com.au/forums


Sticky Finger’s Kali-Pi

Check out Sticky Finger’s Kali-Pi if you are in need of a 1337 penetration testing platform.


Facebooktwitterredditpinterestlinkedinmail
Featured post

STICKY FINGERS KALI-PI

Latest Kali Linux on Raspberry Pi with Touch Screen, Bluetooth and touch optimised interface (New: Bluetooth, Rogue AP, Remote access AP, more tools)

Sticky Finger's Kali-Pi
Sticky Fingers Kali-Pi – The pocket size, finger friendly, lean mean hacking machine.

Need practice targets?
Checkout Sticky Fingers DV-Pi

StickyFingers

Content

  1. Overview
  2. Installation

    1. Quick install using pre-configured  image

      Manual installation:

    2. Vanilla Kali with TFT Touch Screen
      1. Kali Linux
      2. TFT Touch Screen
      3. Applications
      4. House keeping
    3. Sticky Finger’s Menu & Accessories
      1. Boot into console
      2. Create low privilege user
      3. Setup FTP server
      4. VNC Server
      5. SDR-Scanner
      6. Sticky Finger’s menu
      7. Enable auto logon
      8. Screenshot tool
      9. Snort
  3. Tips
  4. Discussion (new discussion forum available)

Ingredients:

Features:

Sticky Finger's Kali-PiSticky Finger's Kali-Pi

Kali-Pi always returns to the touch menu after quitting an application or X.
After turning the screen off, just press anywhere to wake it back up.

Sticky Finger's Kali-PiSticky Finger's Kali-Pi

When PulledPork is done, just tap anywhere on the screen and you’ll return to the main menu

Once the WWW-Server, MySQL server and Snort are running, we can access BASE:
kali-pi_10-3-menu_kali-4-BASE

Clicking “Open-VAS” starts the OpenVAS services and the Greenbone Security Assistant which we can access via web browser:
kali-pi_10-4-menu_kali-4-GSA

2015.11-Kali-Pi-Drone_small2Kali-Pi mounted on a TBS discovery providing aerial support during a pen test.

Installation

Quick Install:

You can follow this guide to download a pre-configured disk image and to configure it for your specific touch screen model in only a few short steps.

Or you can take the red pill and do the
Manual Installation:

Install Kali:

  1. Get kali linux for raspberry pi 3 here
  2. Image your sd card (run “sudo fdisk -l” to get device name):
    sudo dd if=kali-2.1.2-rpi2.img of=/dev/mmcblk1 bs=512k
  3. If you have an sd card larger than 8GB, this is the best time to extend the partition using gparted or fdisk (see fdisk howto). Don’t forget to run “resize2fs /dev/mmcblk0p2” on your Pi afterwards to extend the filesystem to match the new partition size.
  4. Boot the Pi, change the root password and generate new ssh keys:
    passwd
    dpkg-reconfigure openssh-server
  5. update time zone via:
    dpkg-reconfigure tzdata
  6. If you want a swap file, it’s the quickest if you create it at this stage according to tip 4. (thanks to RFA in the forum for pointing this out).
  7. Update it:
    apt-get update && apt-get upgrade

    If you receive an error, you might want to try another mirror (see tip no 12)

  8. A recent Kali update introduced a bug causing the LightDM to not render properly resulting in a black screen with an arrow in the top left corner. The latest update should have fixed that but if the problem persists, we can resolve that by switching to SLiM:
    apt-get install slim

    This will install it and prompt you to select the new display manager.
    Just select “slim” and you are all set.
    Once the bug is fixed you can switch back via:

    dpkg-reconfigure slim
  9. Edit “/etc/hostname” and “/etc/hosts” if you wish to change the hostname

Voila – you are now running the latest and greatest version of Kali-Linux

Install the TFT touch screen:

  1. Assemble the screen, boot up and install the TFT enabled kernel with wifi injection patch and Re4son universal TFT setup tool.
    NOTE: You don’t have to reboot immediately. Just press “N” when prompted and continue setting up the screen

    sudo bash
    mount /dev/mmcblk0p1 /boot
    cd /usr/local/src
    wget  -O re4son-kernel_current.tar.xz https://whitedome.com.au/re4son/downloads/11299/
    tar -xJf re4son-kernel_current.tar.xz
    cd re4son-kernel_4*
    ./install.sh

    For Raspberry Pi 3 and Pi Zero W:
    – Press “Y” when prompted to install bluetooth and wifi drivers (not required on Raspbian)
    – Say “Y” when prompted to enable bluetooth services (you can still disable them later)

  2. Run the Re4son Universal Pi-TFT Setup tool, located in the same directory as the kernel.
    It’s always a good idea to run an update first – I tend to update this tool frequently:

    ./re4son-pi-tft-setup -u

    Next you can run it for real to setup your screen (type “Y” when prompted).
    Example command to set up Adafruit PiTFT 3.5″:

    ./re4son-pi-tft-setup -t 35r -d /root

    Type “./re4son-pi-tft-setup -h” for a list of all supported displays:

    Usage: ./re4son-pi-tft-setup -t [pitfttype]
        -h            Print this help
        -v            Print version information
        -a [user]     Enable autologon for [user], use [user] 'disable' to disable autologon
        -b [bootpref] Set boot preference:
                        'cli' for boot to command line
                        'gui' for boot to desktop
        -u            Update Re4son Pi-TFT Setup
        -r            Remove TFT configuration (undo setup)
        -d [dir]      Specify path of user's home directory to back up and restore some files (defaults to /home/pi)
        -t [type]     Specify the type of TFT:
                                                 '28r'      (Adafruit 2.8" PID 1601)
                                                 '28c'      (Adafruit 2.8" PID 1983)
                                                 '35r'      (Adafruit 3.5")
                                                 '22'       (Adafruit 2.2")
                                                 '4dpi'     (4D Systems 2.4",3.2" and 3.5")
                                                 'elec22'   (Elecfreak 2.2")
                                                 'hy28b'    (Hotmcu HY28B 2.8")
                                                 'jb35'     (JBTek 3.5")
                                                 'kum35'    (Kuman 3.5")
                                                 'pi70'     (Raspberry Pi 7")
                                                 'sain32'   (Sainsmart 3.2")
                                                 'sain35'   (Sainsmart 3.5")
                                                 'wave32'   (Waveshare 3.2")
                                                 'wave35'   (Waveshare 3.5")
                                                 'wave35o'  (Waveshare 3.5" Overclocked)
                                                 'wave35c'  (Waveshare 3.5" Clones, such as:
                                                                             Elecrow 3.5"
                                                                             KeDei 3.5"
                                                                             Osoyoo 3.5")
                                                 'wave40'   (Waveshare 4")
                                                 'wave50'   (Waveshare 5" HDMI)

    NOTE: The Universal TFT Setup tool does it’s best to fully configure all screens based on the manufacturers specifications but has only been tested extensively with Adafruit, Raspbery and Waveshare screens. For all other displays, you may have to edit the following files manually to tweak the settings according to your screen:
    /usr/share/X11/xorg.conf.d/99-fbturbo.conf
    /usr/share/X11/xorg.conf.d/99-calibration.conf
    You can use the xinput-calibrator tool in the tools directory to calibrate the touch screen if required.

    1. The default font is a bit chunky. Check out my tip at the bottom of this blog to change it to Terminus 6×12. Looks much better.
    2. reboot
      The screen should be working now.
    3. To get the internal bluetooth working, refer to this forum post

Install Applications:

  1. Install some additional packages:
    apt-get install aptitude curl cmake build-essential mailutils python-dev python-pip libusb-1.0-0-dev python-numpy htop ftp locate screen kismet pure-ftpd tightvncserver mysql-server darkstat ntopng mana-toolkit beef-xss resolvconf mitmf dns2proxy dnsmasq hostapd
  2. If you have a 16GB sd card or larger and want to have kali in all it’s glory, get yourself a coffee and install the full kali suite (Note: 16GB is very tight, better to use 32GB. Run df -h to make sure you didn’t forget to extend your file system earlier 😉 ):
    apt-get install kali-linux-full

    The installation might hang during the wvdial setup. It can happen whilst sitting on “setting up wvdial”. Just kill the “wvdialconf” process and follow this guide.

  3. If not, install only the metasploit edition:
    apt-get install metasploit-framework
  4. Disable autostart of MySQL (we’d rather start it manually when needed):
    systemctl disable mysql

House keeping items:

  1. Update locate db:
    updatedb
  2. Setup OpenVAS:
    apt-get install openvas
    openvas-setup
    mkdir -p /etc/systemd/system/greenbone-security-assistant.service.d/

    allow web access to gsa by creating the file “/etc/systemd/system/greenbone-security-assistant.service.d/local.conf” with this content

    [Service]
    ExecStart=
    ExecStart=/usr/sbin/gsad --foreground --listen=0.0.0.0 --port=9392 --mlisten=127.0.0.1 --mport=9390

    you can change the automatically generated admin password with the following commands:

    openvasmd --user=admin --new-password=<new password>
    history -c

    The “history -c” command clears the bash history – important after entering a password on the command line.

  3. add to “/etc/kismet/kismet.conf”:
    ncsource=wlan1
    logprefix=/home/ftp/pi/kismet

    This makes wlan1 the default capture device and all log files are being written to the ftp directory for easy remote retrieval (skip this if you are not installing the ftp server below).
    Use a kismet compatible USB dongle like the TP-Link TL-WN722N.
    To make thinks more predictable, you might want to assign wlan1 to your dongle permanently, e.g. via adding the following to “/etc/udev/rules.d/70-persistent-net.rules”:

    # USB device 0x:0x (ath9k_htc)
    SUBSYSTEM=="net", ACTION=="add", DRIVERS=="?*", ATTR{address}=="", ATTR{dev_id}=="0x0", ATTR{type}=="1", KERNEL=="wlan*", NAME="wlan1"
  4. Speed up booting without eth0 by adding to “/etc/dhcp/dhclient.conf”:
    timeout 10;

STOP HERE TO STICK WITH VANILLA KALI.

KALI-PI CUSTOM LAUNCHER:

Boot into text mode

  1. Disable display manager with the Re4son Pi-TFT Setup tool :
    cd /usr/local/src/re4son-kernel_4*
    sudo ./re4son-pi-tft-setup -b cli
    • To change it back, just run:
      cd /usr/local/src/re4son-kernel_4*
      sudo ./re4son-pi-tft-setup -b gui

Create a low privilege user

  1. Create standard user to drive the launcher, etc.:
    groupadd ftp
    adduser pi
    usermod -a -G sudo,ftp,kismet pi
  2. Adjust the user profile by adding to “/home/pi/.profile”:
    export FRAMEBUFFER=/dev/fb1
  3. remove sudo password from some standard commands by adding to sudoers via visudo (run “visudo” and insert the following line after “%sudo”):
    %pi	ALL=(ALL:ALL) NOPASSWD: /sbin/poweroff, /sbin/reboot, /sbin/shutdown, /home/pi/Kali-Pi/menu

    If you have never worked with the legendary vi editor then you may be stuck here 😉
    Don’t fear, this is what you have to do:

    Navigate to the spot you would like to edit.
    Press “<ESC>” then “i” to switch to “insert mode”
    paste the above line
    Press “<ESC>” then “x” then “<ENTER>” to save the file and exit.
    If you’ve made a mistake, just press “<ESC>” then “q!” then “<ENTER>” to exit without saving, then try it again.

    Don’t forget to “man vi” and to get one of these if you want to become a hardcore unix hacker.

FTP Server

  1. Setup pure-ftpd :
    mkdir -p /home/ftp/pi/kismet
    chgrp ftp /home/ftp
    chown pi:pi -R /home/ftp/pi
    chown pi:kismet -R /home/ftp/pi/kismet
    pure-pw useradd pi -u pi -d /home/ftp/pi
    pure-pw mkdb
    cd /etc/pure-ftpd/auth
    ln -s ../conf/PureDB 60pdb
  2. If you ever want to change the ftp password, just type:
    pure-pw passwd pi
    pure-pw mkdb

Configure VNC Server:

  1. A bug in xfce4 might prevent a vnc session if an active desktop session already exists, and log the following error in ~/.xsession-errors:
    xfce4-session: Another session manager is already running
    To fix that, type:

    wget -O ~/.vnc/xstartup https://github.com/Re4son/vncservice/raw/master/xstartup
    mkdir /home/pi/.vnc/
    cp ~/.vnc/xstartup /home/pi/.vnc/
    chown pi:pi /home/pi/.vnc/
    chown pi:pi /home/pi/.vnc/xstartup
  2. Set a vnc server password:
    vncpasswd
    sudo pi vncpasswd
  3. Optional: to install vncserver as a service type:
    wget -O /lib/systemd/system/vncserver@.service https://github.com/Re4son/vncservice/raw/master/vncserver@.service

    To enable and start the service, type:

    systemctl enable vncserver@1 && systemctl start vncserver@1

Install SDR-Scanner:

  1. Login as user Pi and install the touch friendly SDR-Scanner:
    cd ~
    git clone git://git.osmocom.org/rtl-sdr.git
    cd rtl-sdr
    mkdir build
    cd build
    cmake ../ -DINSTALL_UDEV_RULES=ON -DDETACH_KERNEL_DRIVER=ON
    make
    sudo make install
    sudo ldconfig
    sudo pip install pyrtlsdr
    cd ~
    git clone https://github.com/adafruit/FreqShow.git
    cd FreqShow
  2. To run the SDR-Scanner just type:
    python /home/pi/FreqShow/freqshow.py

Kali-Pi Launcher:

    1. Pygame is broken in Jessie because of libsdl1.2-15-10, so we remove it and install the one from from Wheezy.
      • Comment everything out in your /etc/apt/sources.list and temporarily add:
        deb http://archive.raspbian.org/raspbian wheezy main contrib non-free
      • Run the following commands:
        gpg --keyserver keys.gnupg.net --recv-key 9165938D90FDDD2E
        gpg -a --export 9165938D90FDDD2E | sudo apt-key add -
        sudo apt-get update
      • Remove the offending packages and replace them with the ones from wheezy:
        sudo apt-get remove libsdl1.2debian python-pygame
        sudo apt-get install libsdl-image1.2 libsdl-mixer1.2 libsdl-ttf2.0-0 libsdl1.2debian libsmpeg0 python-pygame
        sudo apt-mark hold libsdl1.2debian
      • Restore /etc/apt/sources.list to it’s original state and re-run:
        sudo apt-get update
    2. Install Kali-Pi Launcher:
sudo apt-get install fbi
sudo pip install pbkdf2 RPi.GPIO
cd ~
git clone https://github.com/re4son/Kali-Pi
  1. Adjust the menu launch script to fit your screen, enable PIN and screensaver if desired
    cd ~/Kali-Pi
    nano menu
  2. Allow “Anybody” to start the X server:
    sudo dpkg-reconfigure xserver-xorg-legacy
  3. Start Kali-Pi launcher after login by adding at the end of ~/.profile:
    ## Sticky-Finger's Kali-Pi
    if [ ! -n "$SSH_CONNECTION" ]; then
        export FRAMEBUFFER=/dev/fb1
        /usr/bin/clear &
        sudo /home/pi/Kali-Pi/menu
    fi

Reboot.
Kali-Pi launcher will open automatically after you log in.

Start X as root (if desired):

Out of the box, X is started as user root.

You can change that by editing /home/pi/Kali-Pi/Menus/menu-1.py and replacing the lines:

run_cmd("/usr/bin/sudo FRAMEBUFFER=/dev/fb1 startx")
run_cmd("/usr/bin/sudo FRAMEBUFFER=/dev/fb0 startx")

With

run_cmd("/usr/bin/sudo -u pi FRAMEBUFFER=/dev/fb1 startx")
run_cmd("/usr/bin/sudo -u pi FRAMEBUFFER=/dev/fb0 startx")

Enable Auto Login (if desired):

  1. Enable autologon with the Re4son Pi-TFT Setup tool :
    cd /usr/local/src/re4son-kernel_4*
    sudo ./re4son-pi-tft-setup -a pi
    • To change it back, just run:
      cd /usr/local/src/re4son-kernel_4*
      sudo ./re4son-pi-tft-setup -a disable


Reboot and enjoy.

Optionally: Install screenshot tool

  1. Login as user pi, go to terminal and install zlib:
    cd ~
    wget http://zlib.net/zlib-1.2.11.tar.gz
    tar -xzf zlib-1.2.11.tar.gz
    cd zlib-1.2.11
    ./configure
    make test
    sudo make install
  2. Install libpng:
    cd ~
    wget https://whitedome.com.au/download/libpng-1.6.18.tar.xz
    tar -xf libpng-1.6.18.tar.xz
    cd libpng-1.6.18
    ./configure
    make check
    sudo make install
    sudo ldconfig
  3. Install fbgrab:
    cd /opt
    sudo wget http://fbgrab.monells.se/fbgrab-1.3.tar.gz
    sudo tar -zxvf fbgrab*gz
    sudo mv fbgrab-1.3 fbgrab
    cd fbgrab
    sudo make
    sudo ln -s /opt/fbgrab/fbgrab /usr/bin/fbgrab
    • To take a screenshot and save the picture in the ftp directory, simply type (as root):
      fbgrab -d /dev/fb1 /home/ftp/pi/screenshot.png

Tips:

  1. Don’t use Sandisk Extreme Pro micro SD cards -they don’t work well with kali
  2. I use Sandisk Extreme 32GB and Sandisk Extreme 32GB Plus and my Kali-Pi’s are lightning fast
  3. To enable ethernet gadget mode with bonjour support without having to logon to configure it at all, install the avahiswitch daemon and follow these steps:
    https://github.com/Re4son/avahiswitch
  4. If you use the PiTFT screen with Vanilla Kali, you can output the GUI via HDMI by entering:
    mv /etc/X11/xorg.conf.d/99-fbdev.conf ~

    Reboot and you’ll have X on your big screen
    To switch back, just copy the file across again:

    cp ~/99-fbdev.conf /etc/X11/xorg.conf.d/
  5. Swap – Swap space on flash memory is a religious topic.
    I don’t want to get into that discussion. I use swap because I’ve got plenty of sd cards to burn but not enough memory in my Pi ;-)This is how you can enable it:

    sudo dd if=/dev/zero of=/swapfile.img bs=1M count=1024
    sudo mkswap /swapfile.img
    chmod 0600 /swapfile.img
    sudo swapon /swapfile.img

    add this at the end of /etc/fstab

    /swapfile.img none swap sw 0 0
  6. archive.raspbian.org is not very reliable. Try this mirror instead when downgrading packages:
    deb http://mirror.aarnet.edu.au/pub/raspbian/raspbian/ wheezy main contrib non-free
  7. Persistent interfaces (was fixed in kali the last time I looked) – To avoid having persistent interface names and revert back to the classic interface naming convention (wlan0, eth0, etc.), simply add to the 1st command line in the file /boot/cmdline.txt the following keywords:
    net.ifnames=0 biosdevname=0

    Don’t forget to mount /boot first via:

    sudo mount /dev/mmcblk0p1 /boot
  8. OpenVAS interface choice
    Don’t run an OpenVAS scan via the internal WiFi interface. I would always run my scans via eth0.
    If you have both interfaces connected, specify “Network Source Interface: eth0” in the “task” settings.
  9. Raspberry Pi 3 WiFi drop outs
    Turn off power saving for the internal wifi card.
    Check the status via:

    sudo iwconfig

    to turn off power saving permanently, add the following lines to “/etc/rc.local”

    ## Fix WiFi drop out issues
    iwconfig wlan0 power off

    reboot and confirm via “sudo iwconfig” that it worked.

  10. The Kali menu items are missing because of a .png extension bug in the desktop configuration. We’ll fix that by removing that extension in all files via:
    cd /usr/share/desktop-directories/
    sed -i 's/trans.png/trans/g' *.directory
  11. The default console font looks too chunky on a small screen. I suggest running
    sudo dpkg-reconfigure console-setup

    And select UTF-8 -> Guess optimal character set -> Terminus -> 6×12 (framebuffer only)

  12. To enable the on-screen keyboard in the greeter/login screen, add to /etc/lightdm/lightdm-gtk-greeter.conf
    show-indicators=~language;~a11y;~session;~power
    keyboard=florence --focus

    This will add an “On Screen Keyboard” entry to the indicator menu:

    onscreen

  13. The repository ‘http://http.kali.org/kali kali-rolling Release’ does not have a Release file.
    When getting this error during an “apt-get update”, try another mirror from this list:
    http://http.kali.org/README.mirrorlist
    The following entry in “/etc/apt/sources.list” usually works for me:

    deb  http://kali.mirror.garr.it/mirrors/kali kali-rolling main non-free contrib
    deb-src http://kali.mirror.garr.it/mirrors/kali kali-rolling main non-free contrib
  14. Expanding partition to fill SDCard
    The main partition can be extended to use larger cards in either a different linux system using GParted or in the Raspberry Pi itself whilst the partition is mounted. To do the later you can use fdisk:

    sudo fdisk /dev/mmcblk0
    Command (m for help): p
    
    Device Boot Start End Sectors Size Id Type
    /dev/mmcblk0p1 1 125000 125000 61M c W95 FAT32 (LBA)
    /dev/mmcblk0p2 125001 15523839 15398839 7.4G 83 Linux
    

    This will give you the start of the old partition (e.g. “mmcblk0p2 125001”)

    Command (m for help): d
    Partition number (1,2, default 2): 2
    Command (m for help): n
    Select (default p): p
    Partition number (2-4, default 2): 2
    First sector (125001-31116287, default 126976): 125001 
    Last sector, +sectors or +size{K,M,G,T,P} (125001-31116287, default 31116287):
    Do you want to remove the signature? [Y]es/[N]o: N
    Command (m for help): w
    

    Reboot and use resize2fs to extend the filesystem

    sudo resize2fs /dev/mmcblk0p2
    

    Done.

For those who would like to see the drone in action, following this link.

Comments, suggestions and help is very much appreciated. You can e-mail me on < re4son [at] whitedome.com.au >

Please use the discussion forums for discussions:
https://whitedome.com.au/re4son/forums

the comments section got a bit too long and has been transferred.

Facebooktwitterredditpinterestlinkedinmail
Featured post

Sticky Finger’s Kali-Pi – Configuration of Snort

The Sticky Fingers Kali-Pi installation walk through did not include any detailed information about the configuration of Snort, Barnyard2 and PulledPork on the Raspberry Pi 2 running Kali.

Here are my configuration notes.

Snort:

sudo bash
apt install apache2 apache2-doc autoconf automake bison ca-certificates ethtool flex g++ gcc libapache2-mod-php libcrypt-ssleay-perl default-libmysqlclient-dev libnet1 libnet1-dev libpcre3 libpcre3-dev libpcap-dev libphp-adodb libssl-dev libtool libwww-perl make default-mysql-client mysql-common default-mysql-server php-cli php-gd php-mysql php-pear sysstatcd /usr/local/src
wget https://libdnet.googlecode.com/files/libdnet-1.12.tgz
wget https://www.snort.org/downloads/snort/daq-2.0.6.tar.gz
wget https://www.snort.org/downloads/snort/snort-2.9.8.2.tar.gz
tar xvfvz libdnet-1.12.tgz
cd libdnet-1.12
./configure "CFLAGS=-fPIC"
make && make install && make check
ln -s /usr/local/lib/libdnet.1.0.1 /usr/lib/libdnet.1

cd /usr/local/src
tar xvfz daq-2.0.6.tar.gz
cd daq-2.0.6
./configure
make && make install

cd /usr/local/src && wget --no-check-certificate https://www.snort.org/documents/185 -O snort.conf
tar xvfz snort-2.9.8.2.tar.gz
cd snort-2.9.8.2
./configure --enable-sourcefire; make; sudo make install

mkdir /usr/local/etc/snort /usr/local/etc/snort/rules /var/log/snort /var/log/barnyard2 /usr/local/lib/snort_dynamicrules
touch /usr/local/etc/snort/rules/white_list.rules /usr/local/etc/snort/rules/black_list.rules /usr/local/etc/snort/sid-msg.map

groupadd snort && useradd -g snort snort

cp /usr/local/src/snort-2.9.8.2/etc/*.conf* /usr/local/etc/snort
cp /usr/local/src/snort-2.9.8.2/etc/*.map /usr/local/etc/snort
cp /usr/local/src/snort.conf /usr/local/etc/snort
mkdir /var/log/snort
chown snort:snort /var/log/snort
nano /usr/local/etc/snort/snort.conf

replace

var RULE_PATH ../rules
var SO_RULE_PATH ../so_rules
var PREPROC_RULE_PATH ../preproc_rules
var WHITE_LIST_PATH ../rules
var BLACK_LIST_PATH ../rules

with

var RULE_PATH rules
var SO_RULE_PATH so_rules
var PREPROC_RULE_PATH preproc_rules
var WHITE_LIST_PATH rules
var BLACK_LIST_PATH rules

delete or comment out all of the “include $RULE_PATH” lines except “local.rules”

vi /usr/local/etc/snort/rules/local.rules

Enter a simple rule like this for testing:

alert icmp any any -> $HOME_NET any (msg:"ICMP test"; sid:10000001; rev:1;)

Now we can start and test snort.

/usr/local/bin/snort -A console -q -u snort -g snort -c /usr/local/etc/snort/snort.conf -i eth0

Ping the management IP address from another machine, alerts should be printed to the console like this:
02/09-11:29:43.450236 [**] [1:10000001:0] ICMP test [**] [Priority: 0] {ICMP} 172.26.12.1 -> 172.26.12.2
02/09-11:29:43.450251 [**] [1:10000001:0] ICMP test [**] [Priority: 0] {ICMP} 172.26.12.2 -> 172.26.12.1

Install & configure Barnyard2:

cd /usr/local/src && wget https://github.com/firnsy/barnyard2/archive/master.tar.gz
tar -zxf master.tar.gz && cd barnyard2-*
autoreconf -fvi -I ./m4 && ./configure --with-mysql --with-mysql-libraries=/usr/lib/arm-linux-gnueabihf/ && make && make install
mv /usr/local/etc/barnyard2.conf /usr/local/etc/snort
cp schemas/create_mysql /usr/local/src
nano /usr/local/etc/snort/barnyard2.conf

Line #27 change to /usr/local/etc/snort/reference.config
Line #28 change to /usr/local/etc/snort/classification.config
Line #29 change to /usr/local/etc/snort/gen-msg.map
Line #30 change to /usr/local/etc/snort/sid-msg.map
Line #227 change to output alert_fast
At the end of the file add this line:

output database: log, mysql, user=snort password=<mypassword> dbname=snort host=localhost

Setup the MySQL server

service mysqld start
mysql -u root -p

Type in the root password

In the mysql console (pick a password as ‘mypassword’ that is different from root password):

create database snort;
grant CREATE, INSERT, SELECT, DELETE, UPDATE on snort.* to snort@localhost;
CREATE USER snort@localhost IDENTIFIED BY 'mypassword';
source /usr/local/src/create_mysql

List the newly created tables:

show tables;

Exit the mysql console

exit


/usr/local/bin/snort -q -u snort -g snort -c /usr/local/etc/snort/snort.conf -i eth0 &
/usr/local/bin/barnyard2 -c /usr/local/etc/snort/barnyard2.conf -d /var/log/snort -f snort.log -w /usr/local/etc/snort/bylog.waldo -C /usr/local/etc/snort/classification.config &

PulledPork:

cd /usr/local/src
git clone https://github.org/shirkdog/pulledpork
cd pulledpork
cp pulledpork.pl /usr/local/bin && cp etc/*.conf /usr/local/etc/snort

To use the Sourcefire VRT Certified Rules, go to snort.org, register for an account and get an “oinkcode”, this will allow you to download their Registered User rule set.

edit “/usr/local/etc/snort/pulledpork.conf”:
Line 19: enter your “oinkcode” where appropriate or comment out the line
Line 26: enter your “oinkcode” where appropriate or comment out the line
Line 133: change to: distro=Debian-6-0

chmod +x /usr/local/bin/pulledpork.pl

mkdir /usr/local/etc/snort/rules/iplists

To run:
/usr/local/bin/pulledpork.pl -c /usr/local/etc/snort/pulledpork.conf -T -l

Base:

cd /usr/local/src && sudo wget https://sourceforge.net/projects/secureideas/files/BASE/base-1.4.5/base-1.4.5.tar.gz
sudo tar -zxf base-1.4.5.tar.gz && sudo cp -r base-1.4.5 /var/www/base
sudo chown www-data:www-data /var/www/base
sudo cp /etc/apache2/sites-available/default-ssl.conf /etc/apache2/sites-enabled/

Add virtual directory “base” aka “/var/www/base/” to “/etc/apache2/sites-enabled/default-ssl.conf”

Alias /base "/var/www/base/"
<Directory "/var/www/base/">
  DirectoryIndex index.php
</Directory>

Change line #449 in “/etc/php5/apache2/php.ini” to read:

error_reporting = E_ALL & ~E_NOTICE

Enable SSL

sudo a2enmod ssl
sudo pear config-set preferred_state alpha && pear channel-update pear.php.net
sudo pear install --alldeps --force Image_Color2 Image_Canvas Image_Graph
sudo service apache2 restart
sudo perl -MCPAN -e 'install  Geography::Countries'
perl -MCPAN -e 'install  IP::Country'
cd /usr/share/php/Image/Graph/Images/Maps
cp /var/www/base/world_map6.* .

Start mysql server and apache2 server

Open “https://[ip-address]/base” in your favorite browser and follow steps to configure:
Click Continue, choose English
Path to adodb: /usr/share/php/adodb
Click Continue
Database Name: snort
Database Host: localhost
Database Port: [leave blank]
Database User Name: snort
Database Password:

Create admin user

Click “create baseag” which extends the DB to support BASE.

nano /var/www/base/base_conf.php
Enforce authentication
$Use_Auth_System = 1;

Towards the end, find the line:
//$IP2CC = “/usr/bin/ip2cc”;
Add instead:
$IP2CC = “/usr/local/bin/ip2cc”;

Fix the fonts:

ln -s /usr/share/fonts/truetype/dejavu /usr/share/php/Image/Canvas/Fonts

The following document from Jason Weir helped me a lot:
Debian___Snort_based_Intrusion_Detection_System

As always, please give me feedback in the forums so I can improve on this.

Many thanks,

Re4son

Facebooktwitterredditpinterestlinkedinmail

STICKY FINGER’S KALI-PI – Pre-installed

Kali Linux on Raspberry Pi 1/2/3(+)/4/Zero(W) with touch optimized interface in a ready-to-go image
(Refreshed 03-June-2019 with full RasPi 4 support)

Sticky Finger’s Kali-Pi – The pocket size, finger friendly, lean mean hacking machine
Need practice targets? Checkout Sticky Finger’s DV-Pi


Sticky Finger’s Quick Start Guide:

Sticky Finger’s Kali-Pi image comes with the following features out of the box:

  • 2GB image ready to go with all common touch screens.
  • Kali Linux Rolling edition with MSF meta package and all other essential tools
  • Re4son Kali-Pi Kernel 4.14 with bluetooth, touch screen support and wifi injection patch
  • “re4son-pi-tft-setup” tool to set up all common touch screens, enable auto-logon, etc.
  • “kalipi-config” tool to set up the raspberry pi (improved raspi-config for kali)
  • Apache, Pure-FTP, SDR-Scanner, Screenshot Tool, ntop, darkstats, mana-toolkit,
    Kismet classic, Kismet development, Remote Access AP, Sticky Finger’s Kali-Pi Launcher
  • Boots into vanilla kali gui but comes with user “pi” pre-configured to launch
    the “Sticky Finger’s Kali-Pi Launcher” (touch screen interface) after login
  • Just run “re4son-pi-tft-setup” tool for your particular screen and you are up and running.
  • Out of the box support for on-board Bluetooth & wifi with nexmon patches

Installation

  • 8GB for Kali-Pi MSF – basic Kali MSF package (this image)
  • 16GB for Kali-Pi Full –  install kali-linux-full and OpenVAS (very tight)
  • 32GB  for Kali-Pi Complete – Install the above plus Snort and other goodies
  • Boot up your Pi and ssh into it with user root and password toor
  • Change passwords (default: root=toor, pi=raspberry, ftp/pi=raspberry, vnc/root=toortoor)
  • Set up the screen with the kalipi-tft-config tool:
    kalipi-tft-config
  • Optional: setup wifi and enable “Automatic boot into Sticky Finger’s Touch Interface”:
    kalipi-config
    # Configure wifi
    # Configure boot into command line interface for user pi
    # Change passwords for users "pi" and "root"
    # Set location settings, etc.
    
  • Edit “/home/pi/Kali-Pi/menu” to define your screensize, enable/disable screensaver and PIN:
    ## Adjust these:
    export KPSCREENSIZE=2.8   ## Screensize in inch, Options= 5.0, 3.5, 2.8
    export KPLAYOUT=9         ## Number of buttons - Currently only 9 is supported
    export KPPIN=0            ## Set to "1" to enforce PIN authentication, run ./set-pin to change PIN from "1337"
    #export KPTIMEOUT=2       ## Minutes before screensaver kicks in, comment out for screensaver off
    export KISMETVER=1        ## Set to "2" to launch kismet github version, "1" to use classic stable version
    export TFT=1              ## Set to "0": no TFT screen,
                              ##        "1": TFT touchscreen,
                              ##        "2": TFT screen with external mouse,
                              ##        "3": resistive HDMI touchscreen, or
                              ##        "4": Raspberry Pi 7" Touchscreen 
    ## End adjustments
    

Reboot and enjoy 🙂

For updates

Head over to the forums for more information about the menus and tools.

To pair Bluetooth devices, just start the bluetooth services:

systemctl enable bluetooth
service bluetooth start
systemctl enable hciuart
systemctl start hciuart.service

You are now ready to pair your devices, just like this:

bluetoothctl

[bluetooth]# agent on
Agent registered
[bluetooth]# default-agent
Default agent request successful
[bluetooth]# scan on
Discovery started
[bluetooth]# pair 00:1F:xx:xx:xx:xx
Attempting to pair with 00:1F:xx:xx:xx:xx
…snip…
Pairing successful
[bluetooth]# trust 00:1F:xx:xx:xx:xx
[CHG] Device 00:1F:xx:xx:xx:xx Trusted: yes
[bluetooth]# connect 00:1F:xx:xx:xx:xx
Attempting to connect to 00:1F:xx:xx:xx:xx
Connection successful

Voila – there it is, Bluetooth device connected.

More details can be found here:
https://whitedome.com.au/kali-pi

TIP: How to mount the img file in linux

If you are curious to see what’s in the image file before you write it to the SD card, here is how you can mount it in linux:

  1. Check the file system table with fdisk:
     fdisk -l StickyFingers-Kali-Pi-Small-160827.img
  2. Create a mount point for each image
    mkdir img1 img2
  3. Mount each image
    mount StickyFingers-Kali-Pi-Small-160827.img -o loop,offset=$(( 512 * 1)) img1/
    mount StickyFingers-Kali-Pi-Small-160827.img -o loop,offset=$(( 512 * 125001)) img2/

For questions or comments please join the discussion in our forum:
https://whitedome.com.au/forums

For updates

Facebooktwitterredditpinterestlinkedinmail

Pocket-Kali

Kali Linux 2017.3 on the GPD Pocket

Unofficial Kali ISO Image available now for download
UPDATE: ISO 20171226-1  & Kernel 4.15.0-rc5-re4son+_8

Wifi
Bluetooth
Touch screen
Screen rotation
Proper display scaling & fan control
Built natively with debian lb and d-i

What is working:

  • Proper screen orientation for graphical debian-installer
  • Display properly rotated in terminal buffer, login screen & desktop
  • Scaling set to 0.60 ( 0.50 in gdm )
  • Touchscreen aligned to rotation
  • Multitouch
  • Wifi
  • Screen brightness
  • Cooling fan
  • Bluetooth
  • Sleep/wake
  • HDMI port
  • Charging at full speed
  • USB-C for data
  • Audio & Headphones

What needs some more work:

  • Encrypting the root partition is not supported yet. Coming in mid Jan.


Installation:

  1. Download the latest ISO image from here:
    https://whitedome.com.au/re4son/download/kali-pocket/
  2. Write the image to a USB drive
  3. Insert the stick into your GPD pocket, turn on and press F7 until boot menu pops up
  4. Select boot from USB stick
  5. In the Kali menu, select “Kali Live” and boot into desktop
  6. In Kali, run GParted and unmount primary partition
  7. Run debian-installer-launcher
  8. Install
  9. Reboot
  10. Enjoy
  • The Pocket-Kali image comes with a limited set of tools to keep the size down (i.e. “top10” and “wireless” meta packages).
    Just install “kali-linux-full” to get the whole shebang.
  • Install the latest kernel as documented in the next chapter
  • Follow @Re4sonKernel on Twitter for notifications on updates

Kernel updates:

Version included in ISO: 4.15.0-rc4-re4son+_2

The Kernel is based on Hans’ source tree with all the latest patches to support the GPD Pocket.
You should update to this one:

Latest Stable Version: 4.15.0-rc5-re4son+_8

  • Improved hardware support, performance and stability
  • Workaround for touchscreen I2C errors after resume from suspend
  • Fix for ugly “pcspkr” message on boot
  • Fix for missing objtool during runtime compilations
  • kalified kernel config
  • includes installer

Latest Test Version: 4.15.0-rc7-re4son+_2

  • All of the above, plus
  • Latest kernel updates
  • KTPI patch
  • touchscreen workaround replaced by permanent fix
  • workaround for debian bug #862175
  1. Download and install new kernel via:
    # Either download the stable version:
    # (SHA256: 0e4720abcf7246489d63339773c08a3eeb3fb7a3097d878cdcf313f5e907fb72)
    wget -O re4son-pocket-kernel.tar.xz https://whitedome.com.au/re4son/downloads/12376/
    # Or download the test version:
    # (SHA256: 3d036b373b22e1a79e663090a0137c6e80320ac8bf32bbfa1696af826d60152a)
    wget -O re4son-pocket-kernel.tar.xz https://whitedome.com.au/re4son/downloads/12439/ 
    
    tar xJf re4son-pocket-kernel.tar.xz
    cd 4.15.0-rc5*
    ./install.sh
  2. Remove old re4son kernel, e.g.:
    apt remove linux-image-4.15.0-rc4-re4son+ && apt remove linux-headers-4.15.0-rc4-re4son+

Fixes (Not required for ISO versions 20171226-1 and later):

Backlight Control:

Please copy and paste this into a terminal:

echo "pwm-lpss" >> /etc/initramfs-tools/modules
echo "pwm-lpss-platform" >> /etc/initramfs-tools/modules
echo "i915" >> /etc/initramfs-tools/modules
update-initramfs -u

That’ll fix it. The next image will include this.

 Audio:

Please copy and paste this into a terminal:

wget -O /etc/pulse/daemon.conf https://github.com/Re4son/Pocket-Kali-live-build/raw/master/kali-config/common/includes.chroot/etc/pulse/daemon.conf
mkdir -p /usr/share/alsa/ucm/chtrt5645
wget /usr/share/alsa/ucm/chtrt5645/HiFi.conf https://github.com/Re4son/Pocket-Kali-live-build/raw/master/kali-config/common/includes.chroot/usr/share/alsa/ucm/chtrt5645/HiFi.conf
wget /usr/share/alsa/ucm/chtrt5645/chtrt5645.conf https://github.com/Re4son/Pocket-Kali-live-build/raw/master/kali-config/common/includes.chroot/usr/share/alsa/ucm/chtrt5645/chtrt5645.conf
wget /etc/acpi/events/headphone-jack https://github.com/Re4son/Pocket-Kali-live-build/raw/master/kali-config/common/includes.chroot/etc/acpi/events/headphone-jack
wget /etc/acpi/headphone-jack.sh https://github.com/Re4son/Pocket-Kali-live-build/raw/master/kali-config/common/includes.chroot/etc/acpi/headphone-jack.sh


Feedback and help:

Please join the forums to provide feedback and support. Any help to improve the image is greatly appreciated.

Sources:

https://github.com/Re4son/Pocket-Kali-live-build

https://github.com/Re4son/re4son-raspberrypi-linux

Massive thanks:

Stockmind and friends for the audio and backlight fixes:
https://github.com/stockmind/gpd-pocket-ubuntu-respin

Hans de Goede for the kernel patches:
https://github.com/jwrdegoede/linux-sunxi

Facebooktwitterredditpinterestlinkedinmail